This post has been written in collaboration with BacktoBackSWE.com, a portal for interview preparation.
Table of contents :#
-
Overview
-
Prerequisite knowledge
-
Why should you read this tutorial
-
Introduction to React - building an app for production
-
Introduction to AWS EC2
-
Downloading and running the React app source code locally
-
Creating a build
-
Setting up and connecting to a remote EC2 instance
-
Using pm2 to run the app on the instance
-
Additional pointers on scaling and future references
Overview#
Creating a website on localhost, versus deploying it in a production environment is like comparing a zoo to a forest. There’s way more stuff you need to consider when you’re building for the end user - including scaling, fallbacks, load balancing, security, monitoring, CDNs and so on. In this tutorial, we’ll take our first step into deploying a React application into a production environment and actually seeing it work live, while learning some important concepts that go into ensuring that the app works as expected, in the way. We’ll be using a sample todolist application and deploy it to an AWS EC2 instance. You are free to use the same sample app, or any app of your choice.
Prerequisites#
Since we’re focusing on deploying the application and not creating it, you need not know everything about React. However, you should be aware of the way React works - the concept of virtual dom, how a page is built and populated, and so on. While we’ll be covering some of the concepts in brief in the following section, the react documentation is a good reference point in case you need to refresh on any of the above concepts.
You’ll also need to set up an AWS account. The steps we follow will fall within the free tier offering of AWS, but you’d still need a debit/credit card to sign up. However, as long as you follow all the steps correctly, you won’t be charged.
Why should you read this tutorial#
Developing a web app UI is only the base camp - the rest of the trip to the top of Mt Everest is in deploying it to real users, ensuring that traffic is balanced, that any failure is monitored and handled, and that any security vulnerabilities that might compromise user data are caught and remedied.
This tutorial will focus on deploying a react application on an EC2 instance. Along the way, you’ll learn how a React build gets created and rendered, how we set up and connect to a remote server thousands of miles away via a few terminal commands, the concepts of instances and security groups, and how we can set these up in a few clicks on AWS.
This knowledge will be critical for you to develop applications built for hundreds of users, which is the aim with which most apps are built. Introduction to React - building for production You’ll most likely be aware of what React is and does, it’s a JavaScript library used to create UI components. It uses a Javascript + HTML like syntax called JSX. The HTML bit defines the way the UI looks, and the JS populates data and adds functionality to the application. React is the most popular frontend library these days, given its learning curve is much less steep compared to its competitors like Angular or Vue.
Your first foray into React development would have started with something like npx create-react-app myapp, a command which bootstraps a sample react application and runs it on localhost:3000. However, when you want to let your users use your app, you can’t give them a localhost:3000 link. You need to first ‘build’ the application using npm run build, which creates a directory called build and contains ‘minified’(simplified) CSS, JS and HTML pages and static assets.
If some of the above concepts sound alien to you, do spend some time in understanding how React works under the hood. Some helpful resources are linked in the last section of the tutorial.
Introduction to AWS hosting services and EC2#
Again, AWS isn’t something you’re new to, or you won’t be reading this tutorial, but a one liner for it is that it’s a cloud hosting solutions provider by Amazon that allows you to host, manage and scale applications. For the sake of this tutorial, AWS will provide you the remote server where your React app will eventually run. The server itself will be located in some Amazon Data center, but you’d be able to access it remotely from your PC via a set of commands. We’ll be using the EC2 service of AWS. EC2 stands for Elastic Compute Cloud, and it does what we described above - lets you access a remote server and host applications on it
Downloading and running the React app locally#
The first step is to get hold of the app which we’re going to deploy. As we said earlier, you can perform the deployment steps with any react app of your choice, but if you don’t have one, or are a nerd student and want to follow instructions down to the letter, clone this repo to your local using the following command :
git clone https://github.com/gagangaur/React-TODO-App.git
Next, we install the dependencies and run the application locally. To do that
cd React-TODO-App
npm install
npm start
This will start the react app on port 3000 - you can check it out by going to http://localhost:3000 on your browser.
Creating a build#
What you saw on localhost:3000 was a development version of the application - which is visible only to you, and as such cannot be displayed to users.
We need to create a build of this - package that we can then use to show the app to the users. Go to the terminal and type
npm run build
Once the command runs, you’ll notice that a build directory has been created in your root folder. Go to the file explorer and open it. You’ll see a list of assets like images, as well as a folder called static. Open it, to further reveal 2 folders - CSS and JS.
What the build command has done, is that it has converted the React code into these CSS and JS files, which’ll now complement the index.html file to load the app.
Now, how do we view this ‘built’ version of our app? We need to ‘serve’ our static files so that they are the ones that open up on localhost:3000, instead of the development version.
To do that, install a package called serve, using
npm i -g serve
Once that’s done, run
serve -s build
Setting up an AWS EC2 instance#
Next, let’s set up a remote EC2 server instance. As said before, you’ll need an AWS account for the same. If you don’t already have one, you’d need to create it. Remember, it’ll ask you for debit/credit card credentials, but as long as you follow the steps in this tutorial, you will not get charged for it.
To set up an AWS account, go to https://aws.amazon.com and follow the steps to set up an account. You’ll get a confirmatory mail once your account is set up and ready.
Once you login to the account, you should see a screen similar to this

Click on the blue ‘Launch a virtual machine’ line, and you’ll be taken to the EC2 setup screen, wherein you’d have to select an AMI, an Amazon Machine Image.
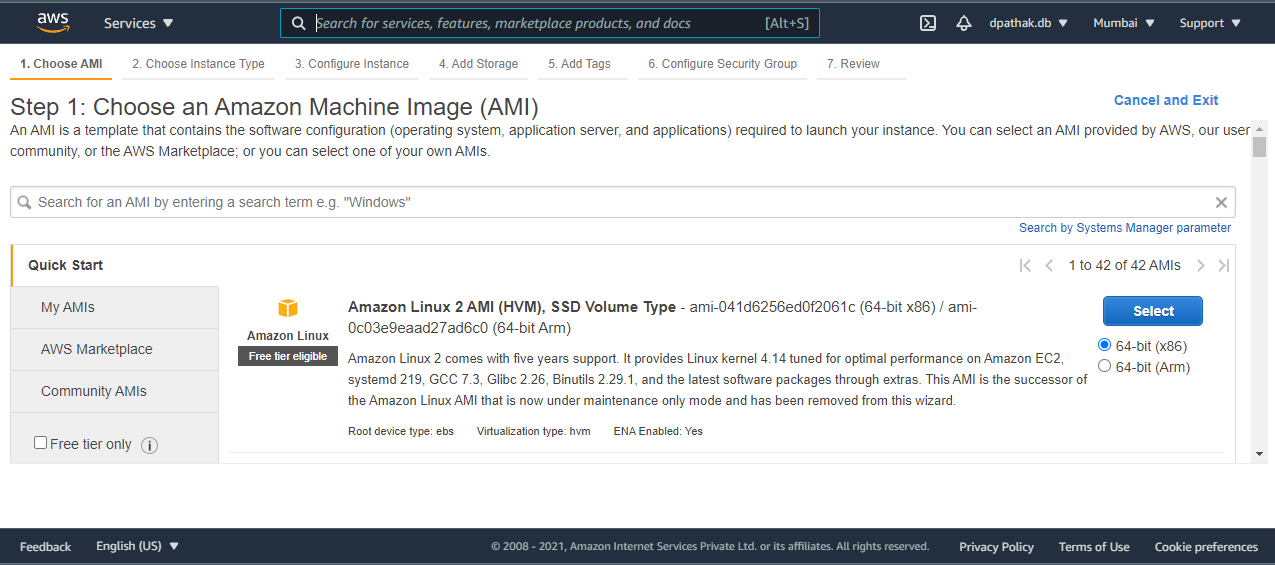
An AMI describes the configuration of the server you’d be using to host your application, including the OS configuration - Linux, Ubuntu, Windows etc. If you have been following tech news, a Mac version was also released for the first time in early 2021.
We’ll be going with Ubuntu server 20.04. You may choose another, but the rest of the steps might vary slightly. Also, do NOT choose an option that doesn’t have the ‘Free tier eligible’ tag, otherwise, you’ll be having to sell off some jewellery to pay the AWS bill.

The next step is choosing an instance type. This describes the server configuration, including CPU, memory, storage, and so on.
Here, we’ll pick the t2.micro instance types, which is the only one available in the free tier. You’ll need larger ones as your application size and requirements in RAM or processing speed increase. In case you’re not clear with any of the column fields, click the information icon next to the headings to get a description of what it means.
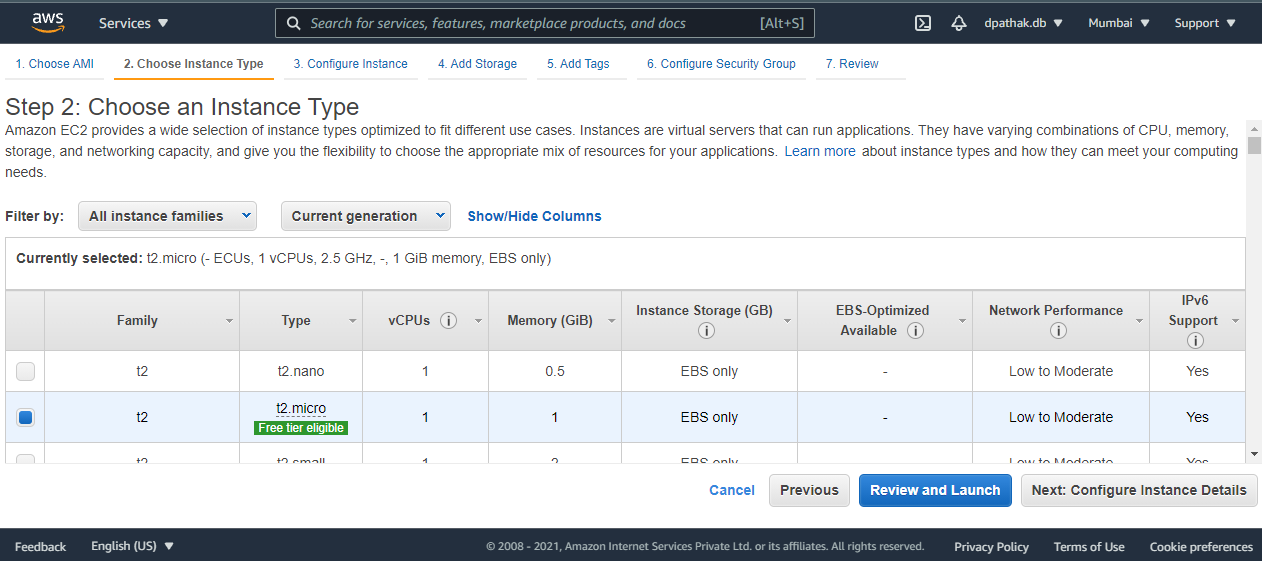
Once this is done, click on Next: Configure Instance Details
Here, you’re asked the number of server instances you wish to create and some properties regarding them. We only need one server instance. The rest of the properties are auto filled based on the configuration we selected in earlier steps and/or default values, and thus, should be kept as it is.
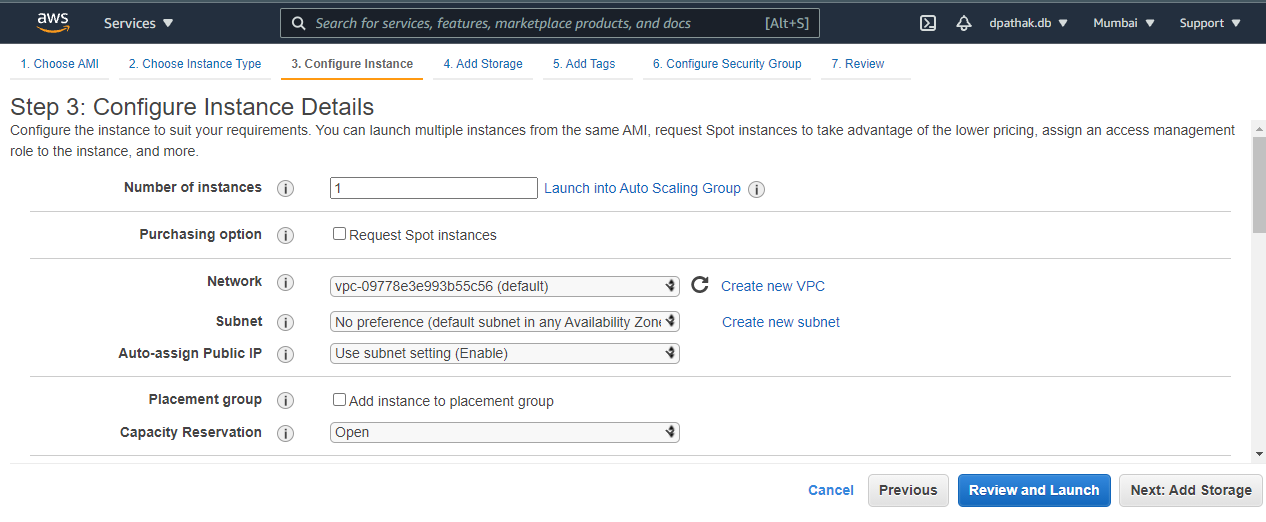
Next, click on Add storage
As the name suggests, storage refers to the amount of storage in our server. Note that this isn’t the storage you’d consider for storing databases. This is temporary storage that will last only as long as the instance lasts, and thus, can be used for things like caching. A size of 8GB, that’s part of the free tier, and is the default, suffices our purpose.
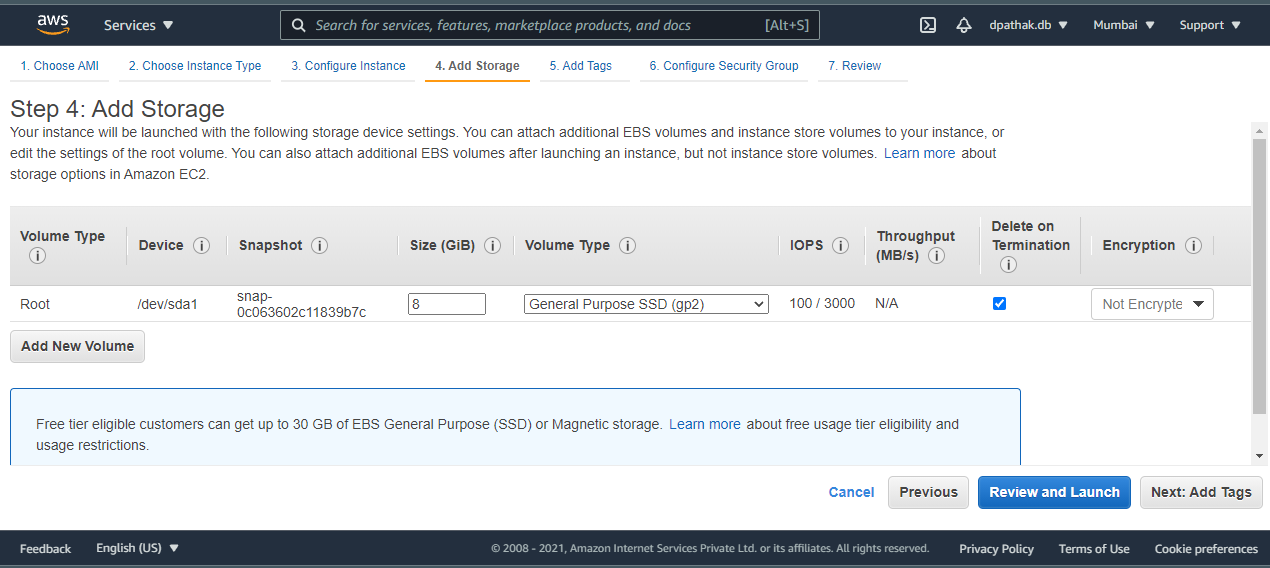
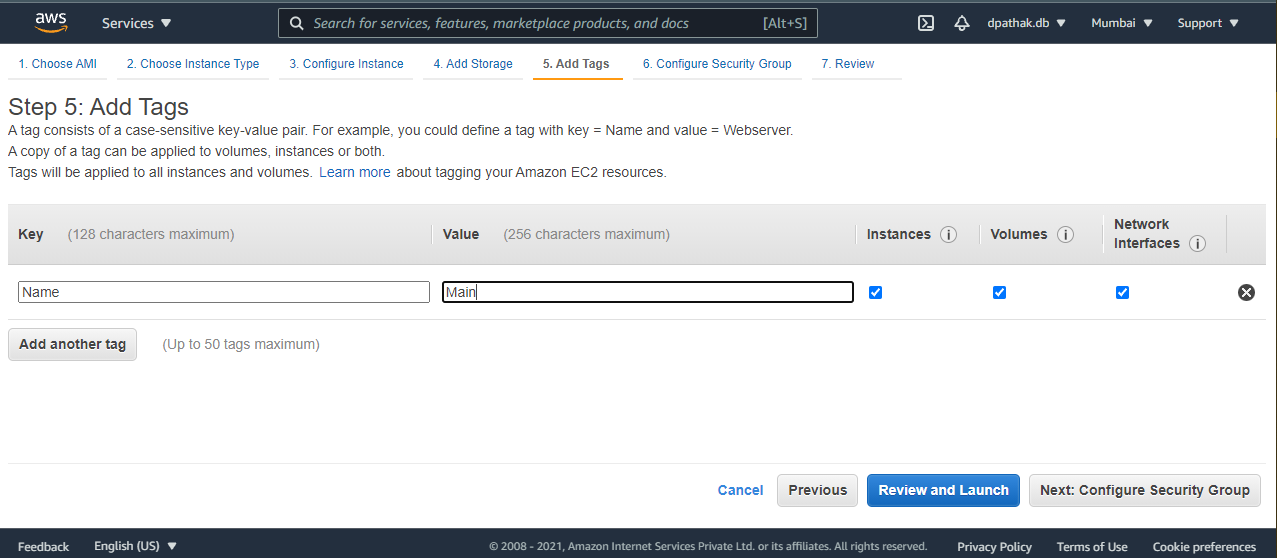
Next, we’d be adding a tag for our instance. It is a key:value pair that describes an instance. Since we only have a single instance right now, it is not very useful, but when you are working with multiple instances and instance volumes, as will be the case when the application scales, it is used to group, sort and manage these instances.
Next, we’ll be adding a security group to our instance. A SG is practically a firewall for your instance, restricting the traffic that can come in, what ports it can access, called inbound, and the traffic that can go out, called outbound. There’s further options to restrict the traffic based on IP. For instance, your application will run on port 3000, and thus, that’s a port you’d want all your users to be able to access. Compare that to a Postgres database service running on port 5432. You don’t want anyone else but you meddling with that, so you’ll restrict the IP of that port to only you.
Create a new security group. Next, we have to add the rules for the group, describing what ports are accessible to the outside world, and who they are accessible to. Note that outbound traffic has no restrictions by default, meaning that your application can send a request to anywhere without any restriction from the SG unless you choose to restrict it. As for inbound, we’ll first add HTTP on port 80 and HTTPS on port 443. Next, we’ll add an SSH rule for port 22. SSH stands for Secure Socket Shell and will allow you to connect to your instance, as we’ll soon see in the coming section. Finally, we’ll add a custom TCP rule for the port our application is going to expose - port 3000.
For simplicity, we’ll keep the sources of all of those at ‘anywhere’. Ideally, SSH should be limited only to those you want to allow to connect to your instance, but for the sake of the tutorial, we’ll keep it at anywhere.

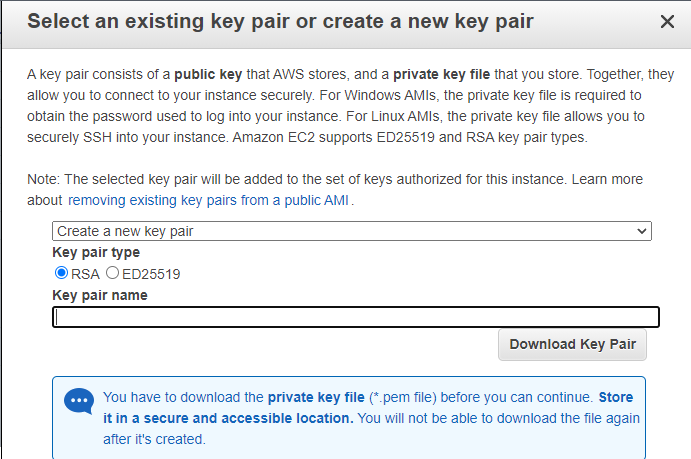
Once the rules are set, click on Review and Launch. You’ll be shown the configurations you’ve selected to ensure you didn’t make a mistake anywhere. Once you hit launch, you’ll be asked to create/select a key pair. As the name suggests, it’s a pair of keys - one held by AWS, and the other by you, that acts as a sort of password for you to connect to your instance. Anyone wishing to SSH into this instance must have access to this key file or they won’t be able to.
The content of the file is RSA encrypted, which uniquely determines your access to the instance. Click on create new, give it a name(that you must remember), and download it.
It’s recommended that you download the .pem key file to C:/Users/Home directory on Windows( /home/usr or similar for Linux and Mac), to avoid any access issues.
Once the file is downloaded, you’ll get a prompt that your instance is starting, and after a few minutes, your instance will be started. Your EC2 home page should look like this. Note the Name : Main(tag), the Instance type t2.micro that we selected when we were setting up the instance.

Next, select the instance, and click on Connect on the top bar. It’ll open this page :

This lists a few ways in which you can connect to the instance. Go to the SSH client tab. Now, we’ll be using the terminal to connect to your instance(remote server). For that, open a new terminal as administrator(superuser or sudo for linux), and navigate to the directory where you stored the .pem key file.
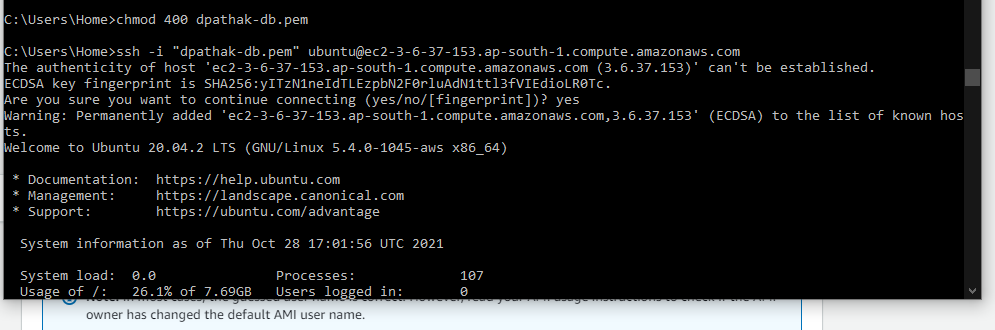
First, we’ll run the chmod 400 keyfilename.pem command to allow read permission on that file, and remove all other permissions. Note that if the key file gets overwritten, you’ll lose SSH access to that instance forever, and you’ll have to recreate the instance, since you won’t get the .pem file to download again.
And once you’re done with that, it’s time for the high jump - connecting via a simple command to a remote computer thousands of miles away. The command to run will be on the AWS page as shown above - the ssh -i … one
It means that we’re ssh-ing into the instance defined by the DNS(the .amazonaws.com thing), and proof that we’re authorized to do it, is in the pem file.
It’ll ask a confirmation prompt that you have to type yes to, and if all works well, you should see a welcome to Ubuntu text as shown above, which means that you’re now logged into the instance.
Great going.
Now, our next step is to bring the code into our instance and run it. To do that, we’ll do a git clone exactly the same way we cloned the repo on our local system, using the git clone command.
Once you’re done cloning the repo, the next step is to install the dependencies and start the application. Navigate to the repo directory and try running
npm install
Did you get an error? Ofcourse you did. You need to install NodeJS on the instance. How do you do that? The answer’s in the error itself :
sudo apt install nodejs
This will take a few minutes to complete. Once it’s done, try running npm install again, and you’ll see that this time, you’re able to.
Finally, the moment of truth - run
npm run start
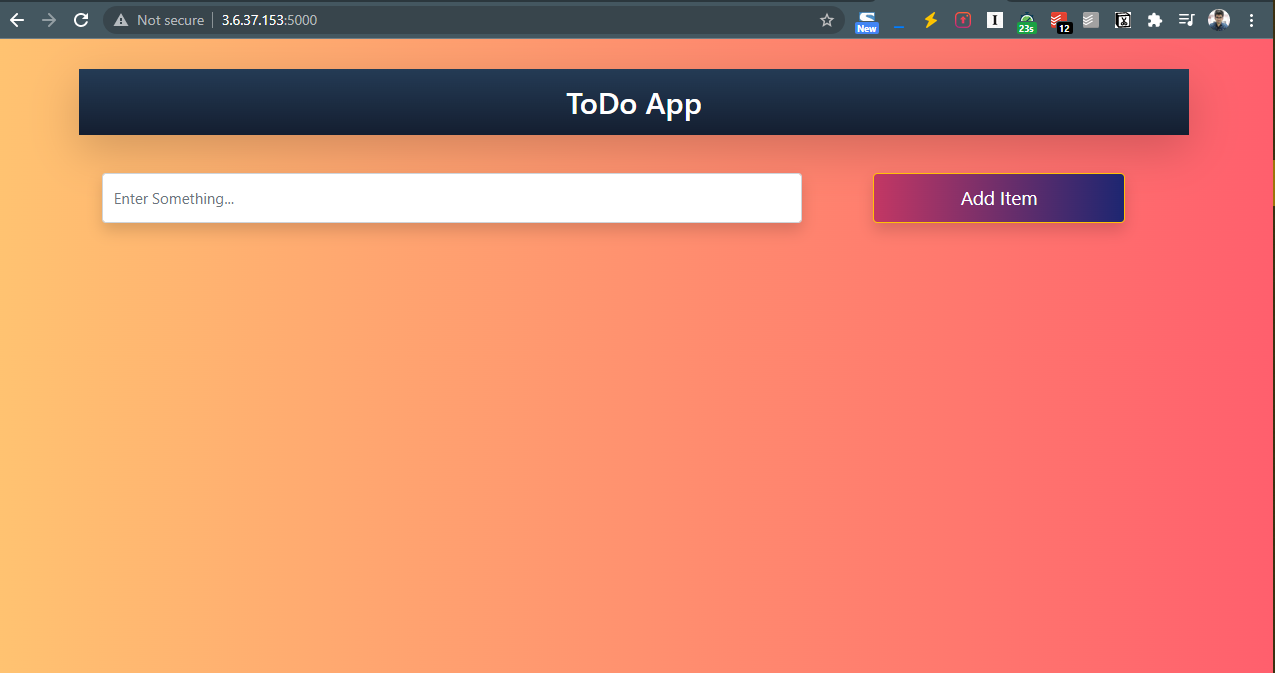
Once you see the application live on localhost:5000 written on the terminal, you’ll have to navigate to the server IP to check if it works.

This IP can be found from the AWS instance details - Public IPV4 address. Copy that, and paste it onto a browser tab, and add :3000 after it.
If the application did work correctly - you should be able to see the same screen that you were able to see locally on your machine.
As we’d seen above, a simple npm run start gives us the development version. However, this is a production environment we’re running the app on, and we need to ‘build’ the app, using
npm run build
Then, following the same steps as we did above, install the serve package and use the command
serve -s build to serve the build version.
Looks good. Or does it?
Did you notice the port number? 5000. Do you think we’d be able to access it with the security rules we created?
To find out, go to the public IP browser tab and replace the :3000 by :5000.
Oops. Doesn’t work, does it? Wouldn’t it be great if AWS could just ‘guess’ the port number!
Unfortunately, that functionality is still not active, and thus, we need to manually add the port 5000 to be allowed. To do that, go to the instances page. In the left navigation pane, scroll down to find the “Network and Security” section, and within it, Security groups. Open it, and select the new security group we’d created when we were setting up the instance(not the default one).
Below, go to the Inbound rules tab, and hit the edit inbound rules button.
Now, put in a custom TCP connection rule for port 5000, and allow access from? You guessed it - anywhere.
Once that’s done, save the rules, and come back to the public IP page, and refresh. If you didn’t mess up, you should be able to see the application loading on port 5000 now!
Great, so you got it all running on a server. But we’re not done. What happens if you close off the terminal. Try doing just that and see if your website still works.
As expected, it won’t. And that doesn’t make sense. For a server to stay up, you need not have to keep a dedicated computer with a terminal on all day - then there’s no point in holding a remote server.
Fortunately, there’s a simple npm package that can keep your app running even when your terminal isn’t. It’s called pm2(most likely short for process monitoring and management). Apart from ensuring that the server remains up, you can use it to check the status of all your node processes running at any time to figure out which of those are causing the issue, logs management, to track the application and see where errors/bugs/incidents if any, occur, and metrics such as memory consumed.
So, we’ll be installing the same on our server and then configuring it to start our react app. Again SSH into the instance using the ssh -i command, go to the project directory, and write
npm i -g pm2
Note the -g flag. It stands for global, meaning that pm2 will be installed as a global package, not just for our project. This is important, because pm2 is expected to handle the restarting of the application even if our project stops, and any project level dependency would not be able to do it.
Once that’s done, we need to start our app using pm2. And remember, we’re looking at the build version,
The command for that is
pm2 serve React-TODO-App/build/ 3000
Note that the above command should be run in the root. If elsewhere, edit the path to the build folder accordingly. And we’ve used the port to be 3000. You may use 5000 as well.
Now, if you close the terminal, you’ll see that the application continues to stay up and running.
Conclusion#
Thus, in this tutorial, we learnt what it means to build a React app for production, how do we create a build locally, and how it works. We then learned how to set up and configure a remote EC2 server, and managed access details. We then set up our repo on the instance, and ran it. Since we wanted the app to continue running even when we closed the terminal, we used the pm2 package for that.
In future blogs, we’ll be looking at how to add load balancers to balance the traffic on our application.