This post has been written in collaboration with BacktoBackSWE.com, a portal for interview preparation.
Introduction#
None of us would want an attack on our servers - neither us, who actually own the applications being run on the servers and whose bread and butter depend on the application running smoothly, nor the cloud provider - AWS, Azure, GCP, who actually own the server and whose bread and butter depend on our continuing to use the server.
However, server attacks, breaches and data thefts have been as old as the concept of shared servers itself. And interestingly, the job of ensuring security is equally distributed between the cloud provider, and the user.
Why, you ask. The cloud provider owns the server, and therefore, it ought to be their responsibility to ensure its security, no? If you open a locker in a bank, they don't ask you to provide a security guard for the safety of your locker,do they? That's their responsibility.
However, the bank does ask you to clearly specify the owners and expect you to remember your details every time you wish to visit your locker. If you end up revealing your details to a thief, who can then access your locker, it's not really the bank's fault, is it? Just like that, AWS does have general firewalls and gatekeepers that are usually meant to keep 'unauthorized' requests out. However, if you end up authorizing a client IP, the firewalls and gatekeepers of AWS will have no choice but to let it through. Thus, it's what AWS calls a 'shared responsibility model', with clearly defined areas which AWS secures, and the others, that the user does.
In this tutorial, we'll be looking at some of the options AWS provides us to ensure security of the servers we rent.
1. User's responsibilities#
The facets of security that the user is responsible for, include :
A. Control network access : Control what requests can come to the server, from what sets of IPs can make requests, and how they can do it(ports). The concept of security groups, which we'll also be doing practically, falls here.
B. Credential management : Who all have the credentials to connect to your server, such as the ..pem file, the access to the private IP of the server, and so on.
C. Server OS updates : What security and critical software updates should be allowed onto the server, how frequently, and what trusted sources.
D. IAM roles : IAM stands for Identity and Access Management, and is mainly useful when different people are responsible for different sets of services on AWS. For instance, the you want to restrict EC2 connection to only a select few, but wish to allow RDS access to some other members of the database team - you can configure that with IAM.
We'll be getting a hands on understanding of A and D, as well as understanding the concepts behind some of the other security practices AWS encourages.
2. Security groups#
We start with this topic, as it's the most commonly configured when working with AWS EC2 for new cloud users.
A security group is a firewall for incoming and outgoing traffic for the server. You can configure it to specify the protocols(SSH, TCP, HTTP, HTTPS etc) and corresponding ports you wish to allow traffic on, and what all IPs you wish to allow traffic from. These are called inbound rules. Similarly, there are outbound rules - that define what all you want your server to be able to access. This is usually kept open, since you're mainly bothered with what comes into the server, and not what goes out.
To understand the role of a security group better, we'll be provisioning an EC2 instance, launching an application on it and customizing the security group to allow access to it. If you already have an EC2 instance running, you may skip the next section.
Setting up an AWS EC2 instance#
As said before, you’ll need an AWS account for the same. If you don’t already have one, you’d need to create it. Remember, it’ll ask you for debit/credit card credentials, but as long as you follow the steps in this tutorial, you will not get charged for it.
To set up an AWS account, go to https://aws.amazon.com and follow the steps to set up an account. You’ll get a confirmatory mail once your account is set up and ready.
Once you login to the account, you should see a screen similar to this

Click on the blue ‘Launch a virtual machine’ line, and you’ll be taken to the EC2 setup screen, wherein you’d have to select an AMI, an Amazon Machine Image.

An AMI describes the configuration of the server you’d be using to host your application, including the OS configuration - Linux, Ubuntu, Windows etc. If you have been following tech news, a Mac version was also released for the first time in early 2021.
We’ll be going with Ubuntu server 20.04. You may choose another, but the rest of the steps might vary slightly. Also, do NOT choose an option that doesn’t have the ‘Free tier eligible’ tag, otherwise, you’ll be having to sell off some jewellery to pay the AWS bill.

The next step is choosing an instance type. This describes the server configuration, including CPU, memory, storage, and so on.
Here, we’ll pick the t2.micro instance types, which is the only one available in the free tier.

Once this is done, click on Next: Configure Instance Details
Here, you’re asked the number of server instances you wish to create and some properties regarding them. We only need one server instance. The rest of the properties are auto filled based on the configuration we selected in earlier steps and/or default values, and thus, should be kept as it is.

Next, click on Add storage
As the name suggests, storage refers to the amount of storage in our server. Note that this isn’t the storage you’d consider for storing databases. This is temporary storage that will last only as long as the instance lasts, and thus, can be used for things like caching. A size of 8GB, that’s part of the free tier, and is the default, suffices our purpose.

Next, we’d be adding a tag for our instance. It is a key:value pair that describes an instance. Since we only have a single instance right now, it is not very useful, but when you are working with multiple instances and instance volumes, as will be the case when the application scales, it is used to group, sort and manage these instances.

Next comes the security group option. Do not edit anything in there for now. We'll edit it later.
Once the rules are set, click on Review and Launch. You’ll be shown the configurations you’ve selected to ensure you didn’t make a mistake anywhere. Once you hit launch, you’ll be asked to create/select a key pair. As the name suggests, it’s a pair of keys - one held by AWS, and the other by you, that acts as a sort of password for you to connect to your instance. Anyone wishing to SSH into this instance must have access to this key file or they won’t be able to.
The content of the file is RSA encrypted, which uniquely determines your access to the instance. Click on create new, give it a name(that you must remember), and download it.
It’s recommended that you download the .pem key file to C:/Users/Home directory on Windows( /home/usr or similar for Linux and Mac), to avoid any access issues.

Once the file is downloaded, you’ll get a prompt that your instance is starting, and after a few minutes, your instance will be started. Your EC2 home page should look like this. Note the Name : Main(tag), the Instance type t2.micro that we selected when we were setting up the instance.

Next, select the instance, and click on Connect on the top bar. It’ll open this page :

This lists a few ways in which you can connect to the instance. Go to the SSH client tab. Now, we’ll be using the terminal to connect to your instance(remote server). For that, open a new terminal as administrator(superuser or sudo for linux), and navigate to the directory where you stored the .pem key file.
First, we’ll run the chmod 400 keyfilename.pem command to allow read permission on that file, and remove all other permissions. Note that if the key file gets overwritten, you’ll lose SSH access to that instance forever, and you’ll have to recreate the instance, since you won’t get the .pem file to download again.
And once you’re done with that, it’s time for the high jump - connecting via a simple command to a remote computer thousands of miles away. The command to run will be on the AWS page as shown above - the ssh -i … one
It means that we’re ssh-ing into the instance defined by the DNS(the .amazonaws.com thing), and proof that we’re authorized to do it, is in the pem file.
It’ll ask a confirmation prompt that you have to type yes to, and if all works well, you should see a welcome to Ubuntu text as shown above, which means that you’re now logged into the instance.

Great going.
Setting up React application on EC2#
The next step is to set up a sample application on the instance. We'll be using a simple React todolist app for the same. We just have to clone it on the instance, like we'd have done for our local laptop/PC.
git clone https://github.com/gagangaur/React-TODO-App.git
You need not know any React for this, since we're only focusing on the security aspects.
Once it's cloned, we'll have to install npm, and then set up the dependencies for the project
The commands are
sudo apt get update

sudo apt get npm
cd React-TODO-App

npm install
Finally, once the dependencies are installed, we run the application using npm run start, and if you'd followed all the steps perfecty, you should see the app running on port 5000

So now, ideally, you should be able to see the app running on the server, right? We access the instance using the public IPv4 address. Copy it from the EC2 console home and paste it on the address bar, and add a :5000 at the end to indicate the port number. Did the application load?
Unfortunately not.
The reason is - security group. Remember, we hadn't made any change to the default security group settings when setting up the instance. And by default, inbound rules restrict everything but SSH access into port 22 - which we used to connect to the instance using the ssh -i.. command. To be able to access the running application from our browser, we need to allow access to the port the application is running on, 5000, to the outside world.
To do that, go to AWS. n the left navigation pane, scroll down to find the “Network and Security” section, and within it, Security groups. Open it, and select the new security group we’d created when we were setting up the instance(not the default one).
Below, go to the Inbound rules tab, and hit the edit inbound rules button.
Now, put in a custom TCP connection rule for port 5000, and allow access from 'anywhere'. Note, to avoid issues arising due to DHCP(Read this for more info), we're allowing access from anywhere, but you can restrict only specific IPs to access some ports.
Once that’s done, save the rules, and come back to the public IP page, and refresh. If you didn’t mess up, you should be able to see the application loading on port 5000 now!
This is the one of the most important security measures put in place by AWS to ensure you're in charge of what traffic you allow in and out of the server.
IAM - Identity and Access Management#
In professional settings, you'll be working across a large team, with multiple people with different responsibilities. It's neither required, nor safe to grant each of the users complete access to everything on your instances. For instance, folks in the database team have only to deal with the RDS services, and have little use case for the lambda services.
To manage the permissions for users, we use this service called IAM.
Go to https://console.aws.amazon.com/iamv2/home#/home
You should see a screen similar to this. This is the IAM home page.

Select the Users option from the left navigation tab, and it'll show the the existing list of users - empty initially. Let's create a user
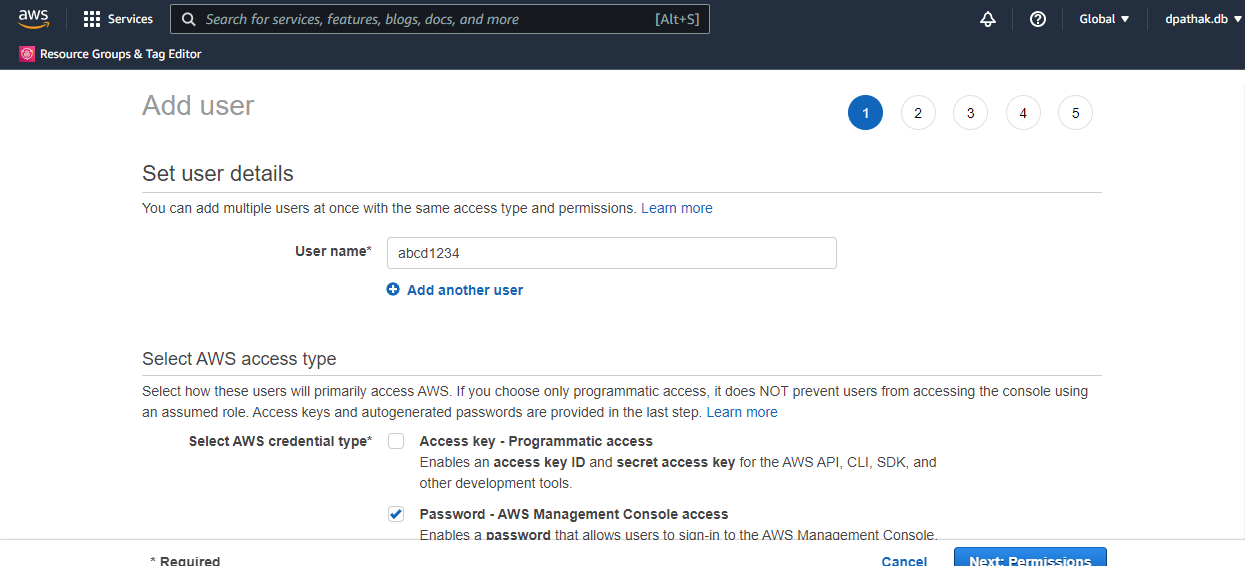
In the AWS access type section, select the password option, and add a custom password of your choice - we're doing this for ease of access. Leave the rest as it is, and click the Next:Permissions button
You'll then see an option to add a user to a group. As the name suggests, a user group is a set of users who'll have similar permissions and accesses. Thus, all members of the database team will have similar set of permissions - to view, edit the database. We won't be bothering with a user group creation in this tutorial.
Click on the attach existing policies directly tab
Here, we have to specify the permissions we wish to grant to this user.
We'll add the PowerUserAccess, since we want this user to have complete control of the EC2 instance.

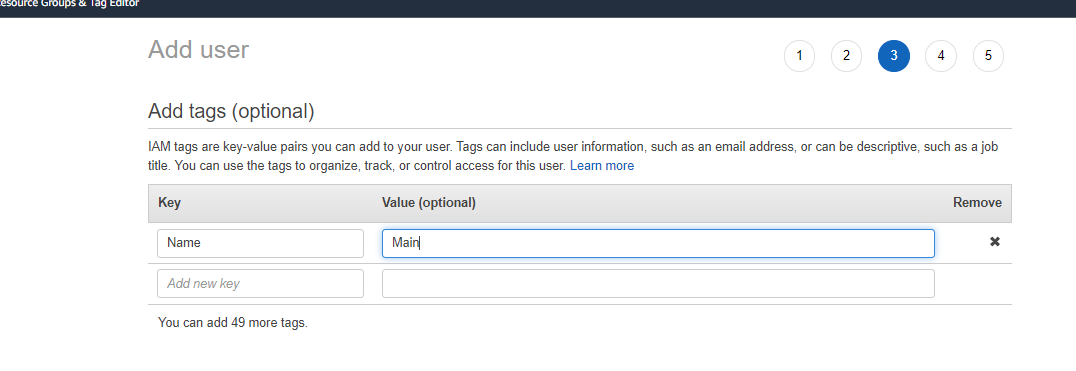
In the set permissions boundary section, leave it unchanged. Click on the Next:Tags button
Add a tag like so
Click on Next:Review, take a scan at all the options you've chosen, and finally hit Create user to see a screen like this
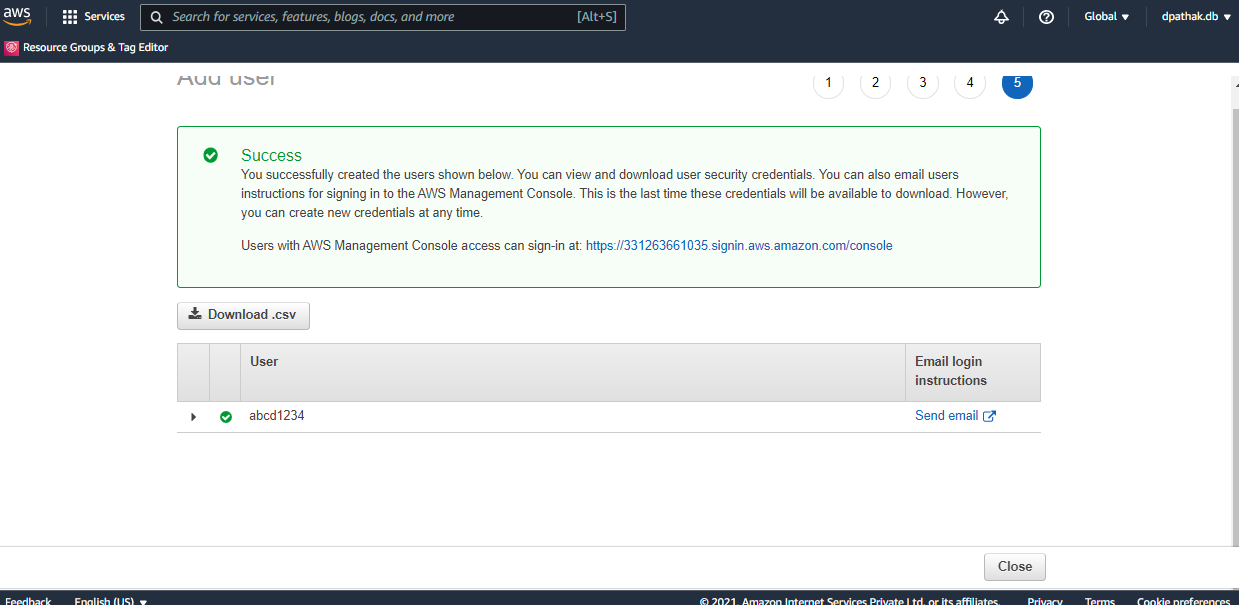
Woohoo! You have successfully created a new user. You can download the csv containing the user details, or mail the access details to the user you wish to assign it to. The user will then be able to access the information she/he is allotted, without you having to share your root AWS account password. Sweet, no?
Network Isolation#
A virtual private cloud (VPC) is a virtual network in your own logically isolated area in the AWS Cloud. Use separate VPCs to isolate infrastructure by workload or organizational entity.
A subnet is a range of IP addresses in a VPC. When you launch an instance, you launch it into a subnet in your VPC. Use subnets to isolate the tiers of your application (for example, web, application, and database) within a single VPC. Use private subnets for your instances if they should not be accessed directly from the internet.
These were some of the major security features that AWS allows us to leverage and customize, to ensure server security.